Sunday, July 31, 2011

Rigging

This was a bigger pain that I thought it was going to be. I have rigged simple tank tracks as practice before, but those were always as separate high poly links. Here The only way to get the tracks with the bones to work is to add division/or use separate links. I didn't want to add any more geometry, so I ended up making the UV's animated, which in action look just as good as moving the actual geometry. One control that I could think of a way to add easily was deforming parts of the tracks and while keeping it as a single piece of geometry and then figuring out a good way to hook that up to some control.

A breakdown of the rig:

Top Circle: Used to tilt the whole body to create some sort of slight suspension in animation.
yellow circles: used to control the drivers levers.
Orange circles: used to control the rotation of the wheels.
Blue rectangle: used to move the entire object/rig.


ZBrush Pose


It took me a while to get used to it but now that I have, I think its a much better alternative to rigging and posing in Maya.

Here's a video I made too: VIDEO

Thursday, July 28, 2011

Nurbs Assignment: Keg Hammer


For my Nurbs assignment I decided to model a weapon I made up the other day. I'd imagine in being in a zombie survival game, and plan to put it in one if I get the chance. For all purposes though, unless someone can prove they thought of it first, the keg hammer is my intellectual property.

I did it in an hour flat using nurbs and then converted it to poly.

NURBS model


Here is my NURBS jar that i did in max, I became confused on the assignment last week, and did a sub d model instead of a nurbs model. sorry for the confusion.

Wednesday, July 27, 2011

NURBS BANNER

NURBS (the one true enemy of the world)


So for my NURBS assignment, I decided to to model my Wacom Intuos Tablet that sits directly behind my keyboard. I basically just have the shape. I'm not sure how to actually cut into the mesh or if it's possible at all (which, if true, gives me another reason to hate NURBS. I already had plenty ya know!). Really, NURBS are a complete downer to work with. I kind of have an Idea of how they could have been used, but the fact that they are not supported in Maya or Max really makes me question their overall purpose (wern't Sub-D's supposed to phase NURBS out? why are they still here?).

Tuesday, July 26, 2011

Progress


Finally ready to throw it into zbrush.

The Pen


I think the main time consumer here was just not being familiar with the tool set but I did get a bunch of weird bugs that I didn't know how to fix so I had to keep re-starting.

I'm sure that if I stick with it, it will come faster just like modeling normally so overall I don't really like NURBS but I can understand its use and respect it.

Monday, July 25, 2011

Nubs car

nurbs car converted to polys with basic color.

Zune using NURBS


Worst ever

Blightfiend got that SWOLE BODEH... and unwrapped

SWOL BODEH!
And I finally got the UVs to behave by completely dismantling the paws so here they are.

Night Vision Goggles

Some NURBS night vision goggles.


NURBS Stuff

 This is my NURBS model.  I started with this.  Despite it's simple structure, this took me several hours to construct with NURBS.  Using them has far less freedom than working with polygons and it was a struggle all the way through.


This is the conversion to polygons.  It's not optimized at all as you can see by the triangle count, but it looks exactly the same.


Below is the SubD model.  I had these weird dark regions at the centers of my wheels.  Not sure what was causing that.

NURBS


I participated in the Game Jam over the weekend over the weekend so I didn't have any time for class work but I made this hand this morning to try out NURBS modeling for the assignment.

model progress


Here is the WIP for the warrior character im doing, along with the armor variant sheet I worked on this weekend.

Sub D model


this is the prop I decided to do for my character. A Roman Gladius


Saturday, July 23, 2011

Rigging, Posing for Portfolio Presentation

For Character Modelers:
Next week we'll talk about posing your ZBrush characters and rigging your models for the folio presentation for Finals.

This model was posed and painted in ZBrush. Still a WIP with many anatomy errors to be cleaned up. The hair and shadow were added in PS. The mane and tail will be completed on the game model in a 3D package.


This is the ZBrush model before it was posed for this demo. Still a WIP with many anatomy errors which need to be corrected. Video tutorials will be available in the shell for Monday for posing your characters in ZBrush.


For the Vehicle Modelers:

We will create a simple rig for our vehicles. Are you ready!


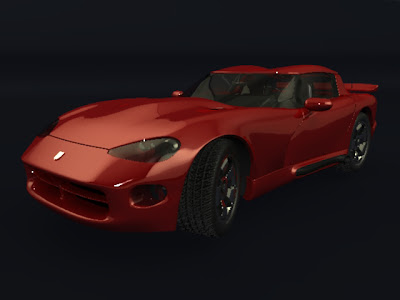
The Viper is still a WIP but got it far enough along to do the tutorials. Below rendered with the HDRI lighting setup; has anyone tried it yet? See the video tutorials for the information.


Monday, July 18, 2011

High poly additions


I would have had the shovel done had it not been for a corrupted save as well as a crash =(

Blightfiend and concept art COW

So i got a bit more done in z brush, much better in my opinion. I also started putting some pads on the paws but they don't look quite right yet.

This is actually what has been taking up most of my time this past week. I started doing the conceptart.org creature of the week finally, this is my take on this week's creature, the eyeless iridescent phase-walker.

Veil Runner: Progress


Afflicted Character


I haven't made any progress on my character for class so I thought I would show you all the Afflicted character I made instead.


There are a few elements I didn't detail in ZBrush because they will be duplicated later on like the boot and some other repeating objects.

more to see


more progress


So there isnt a lot of progress on the savage character this week but it doesnt mean I havnt been busy.